This page offers some of my views on how to set up a guitar (with an emphasis on the electric guitar) for good intonation and playability. I'll also present some ideas on how to tune the instrument.
The adjustments fall into two main categories: intonation and action. Intonation describes how well the instrument plays in tune across its range, and is affected by fret placement, saddle position, nut position, string gauges and materials, and action. Action describes the playability of the instrument, as a function of string height, which is affected by the nut slot depth, the neck relief (truss rod adjustment), bridge/saddle height, and again to some degree the string gauge and material
Before making any intonation adjustments or setting the action or neck relief, check the nut slot height. Ideally, the strings should sit at the same height as if the nut were just another fret. (Guitars with a zero fret achieve this by actually using a fret in place of the nut). If the slots are cut too deep, buzzing may be unavoidable. If too high, the action will be uncomfortably high near the nut, and intonation will be adversely affected, because fretting will increase the string tension more.
TODO: diagram
The slot heights can be checked with the guitar unstrung, using a short straight edge touching the first two frets and the front face of the nut. Where the edge meets the nut (or just above) is where the bottom of the string should be. A handy trick is to file a short pencil in half, place it lead-side down on the frets and use it to trace a line on the nut where the fret height would be.
You can also check the slot heights with the strings on and tuned up, using the strings as straight edges. Press the string down to the frets between the second and third fret (as if you were fretting the string “backwards” at the second fret). There should be just the smallest amount of clearance between the string and the first fret (check for play using your other hand). If there is none at all, the nut slot may be cut too deep, or you may have a problem with fret wear. If there is more than about half a mm(?), consider deepening the nut slots (but be careful, or have a luthier do it for you).
When filing the nut slots deeper, place a feeler gauge of the appropriate depth under the nut so you know when to stop. A bit of tape on the gauge will protect it slightly and alert you to when you're done.
TODO: diagram
Repeat for the other strings.
TODO: Tricks for measuring and filing the nut slots: half-pencil for marking out, feeler gauges to stop the file, electrical continuity tester?!
* bridge height? slant angle?Guitar necks are constructed to have a slight upward bow (“neck relief”), to minimise fret buzz across the fingerboard by accommodating the elliptical profile of the vibrating strings. However, if there is too much relief, the action will be too high and playability and intonation will suffer. If there is not enough, regions of the fingerboard will suffer fret buzz that may be difficult to correct by raising the action at the bridge.
Most guitars have an adjustable metal truss rod in the neck that pulls against the strings when tightened, straightening the neck. Loosening the truss rod permits the neck to bow upward more. The amount of relief or bow in the neck can be measured with a feeler gauge, with the strings on and at playing tension, with the action roughly set. Use the same strings you intend to play with. To make sure the measurement is independent of action, put a capo at the first fret, and hold the string down with your finger around the 15th fret(?). Measure the string height/clearance at/above the ?? fret using a set of feeler gauges. [TODO: table of measurements - varies with scale length?] Only a small amount of relief is required—you can probably achieve the lowest action with a nearly flat neck.
The neck relief will affect the action, and you don’t want to be using action adjustments when the root cause is too much or little neck relief, so set up the neck relief first. However, they do interact to some extent, so you may need to make further adjustments to the relief after adjusting the action. The relief affects the action at the lower frets more, whereas the bridge/saddle height has a greater effect at the higher frets.
Changing the string height or “action” affects playability, fret buzz, and intonation. If the neck relief is set correctly, the action should affect the entire fretboard more-or-less uniformly. A higher action is less prone to buzz but fretting requires more force, which also pulls the note sharper on the higher frets. A lower action is easier to play, but may be prone to buzzing, when the vibrating string strikes frets other than the one being played.
Because the action affects the intonation, the action should be set up first.
TODO: how to measure and table of common/typical values
The first step in setting the intonation of the guitar is to get the fretted notes playing in tune with each other. This is done using adjustments at the saddle on the bridge. String length adjustments at the saddle are necessary to compensate for the progressive sharpening of notes as you ascend the fretboard. Each time you stop (fret) a note, you increase the tension on the string, thereby raising its pitch beyond what you would expect given the fret placement. Because of neck relief, neck angle, bridge height, and general action (string height), frets higher on the fingerboard have higher action and require the string to be stretched more to be fretted, so they experience greater sharpening in pitch. By lengthening the string at the saddle, you can compensate for this sharpening. Note that saddle compensation should not be used to try to align fretted notes to the open string or 12th-fret harmonic (this correction should be done at the nut—see Step 5).
Remember that a longer string has a lower pitch, all other things being equal, and lengthening the string at the saddle will lengthen the string at the higher frets by a greater proportion than for the lower frets. [Illustration?] If a high fret play sharp compared to a low fret, lengthen the string at the saddle. If the high fret plays flat compared to the lower fret, shorten the string. Compare a few frets (say the 15th and 3rd, 17th and 5th 19th and 7th) to ensure good coverage, and don’t forget to loosen the string before adjusting the saddle position.
You may not be able to get all the frets exactly in tune with each other, but you should be able to get within a few cents if the frets are correctly positioned.
One important point to note: when setting the saddle compensation, do not use a harmonic or the open string as a reference pitch. Unless you have already set up string length compensation at the nut, the open strings will likely play flat compared to the rest of the fingerboard. Harmonics suffer from the same problem. I have seen many intonation guides that use the 12th-fret harmonic as a guide for intonation, with the aim of setting the fretted 12th fret to the same pitch. The problem with this is that a fretted note is (generally) expected to play sharp compared to an unfretted one such as the open string or a harmonic. With a correctly compensated nut, it might work, but otherwise trying to align the harmonic and the fretted note at the 12th fret will probably give incorrect intonation. When making saddle adjustments, only compare apples with apples: a fretted note with another fretted note on the same string.
You need a high-precision tuning reference to do this well. A decent electronic tuner should work, though a stroboscopic tuner is often the preferred type, as they are are particularly sensitive to small deviations (a tenth of a cent, i.e. a thousandth of a semitone, is typically measurable with these). I’ve implemented a strobe tuner for Pure Data which you can download here. Some day I might implement an app for Android, but there are tuners available for Android and iOS already.
The second part of intonation is to adjust the string length at the nut. Nut compensation is to ensure that each open string plays in tune with the fretted notes on the same string. An open string is under less tension than a fretted one, so the open string will tend to be flat (compared to the rest of the fretboard) if the nut is where the 0th fret would be. Gluing shims to the face of the nut is one approach, but it may be better to use shims, unglued, just for testing, and file a new nut to the correct dimensions for each string once determined. The open string lengths will probably need to be shortened, so filing the nut for a shelf-type overhang or removing a small amount from the end of the fingerboard may be necessary. The nut slot height, neck relief, action, and string gauge will all affect how much compensation is required, so this should be left until last. The nut slot height in particular will affect the open vs. fretted pitch, so make sure these are cut nice and low (but not too low!).
Most guitars do not have adjustable nuts, but in a perfect world it would be possible to adjust the height and length of each string at the nut easily. Perhaps I should design one. This article by Stephen Delft from 1992 describes the approach of making your own adjustments in detail. The Earvana and (more basic) Buzz Feiten nuts offer prefabricated one-size-fits-all approaches to this problem.
Now that the neck relief, action, and intonation have been set up, you can attempt to tune the instrument precisely. Here I assume that tuning to equal temperament is the aim. In equal temperament, an octave is an exact doubling of frequency [mention stretched piano tunings?], and the octave is uniformly divided into 12 semitones or half-steps. That is, each semitone has a frequency of exactly [formula]. Because a certain amount of beating between harmonics is normal with equal temperament, I recommend against using your ear alone to tune. An electronic tuner offers an impartial and precise means of setting the tuning to the correct absolute pitch.
Tuning to the open strings is convenient but only makes sense if the nut is correctly compensated. If not, you may get better results by tuning to say the 3rd or 5th fret on each string, although this is awkward unless you have three hands or a bridge with fine-tuners (and without a compensated nut, you will probably still find that some of the open string pitches are unacceptably flat).
I have also heard guitarists and bassists use harmonics on adjacent strings to tune, adjusting the string tension until the beating stops. This is misguided. The only harmonics that correspond exactly to pitches on the equally-tempered scale are the octaves, so even if the instrument’s nut compensation is correct, this method will not give you correct tuning (although it is quick and easy and does not require a tuner). Furthermore, the error in tuning one string to the previous one will accumulate as you progress through the strings. See this article for a more detailed explanation of why this is so. If you need to tune without a tuner, I suggest tuning the high and low E strings to each other, then working inwards from there, comparing fretted octaves with the adjacent open string. If bridge and nut intonation are set correctly, this should work well, and is nearly as convenient as tuning with harmonics (especially if your bridge has a fine tuning adjustment, as you can fret with your normal fretting hand and tune with your dominant hand).
To tune by ear if the instrument doesn’t have a compensated nut, it may be better not to use any open strings when tuning. Tune the 5th fret on the low E string to a reference A, then tune the 2nd fret on the A string to the 7th fret on the low E (hold the frets down with your preferred hand approaching from above, and pluck and tune with your non-preferred hand). Then tune the 2nd fret on the D string to the 7th fret on the A, and so on (except for tuning the B string, which should have the 2nd fret note matching the 6t fret on the G string).
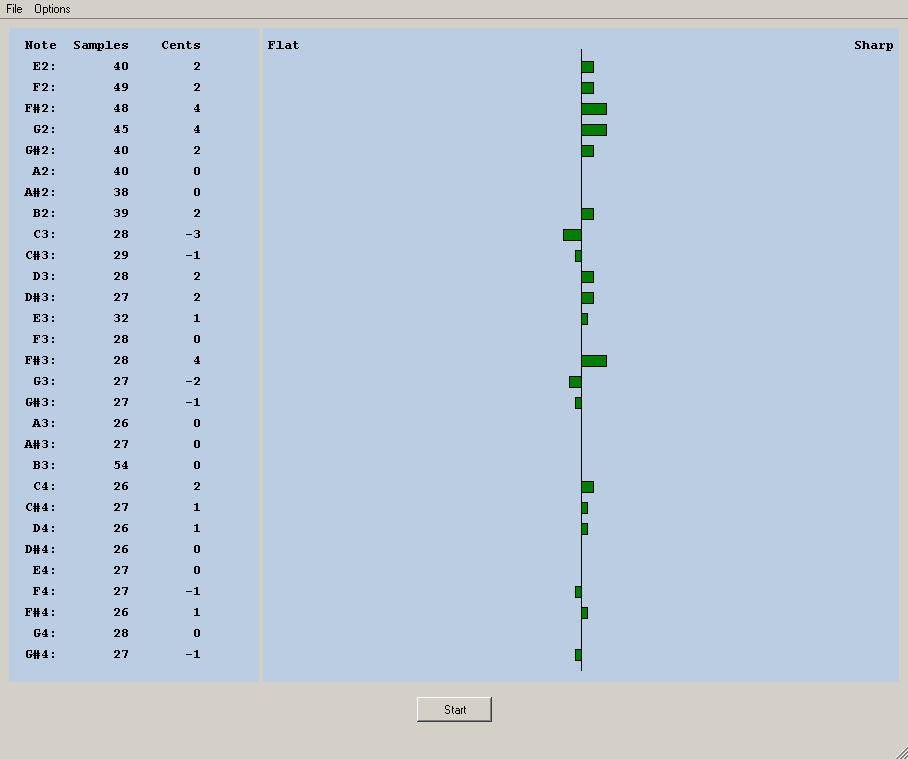
For checking your tuning and intonation under real playing conditions, try the Flutini software. This records and analyses a section of your playing, producing output like the image below:
If it’s just in one region of the fretboard, especially towards the nut, it's probably insufficient neck relief. Try loosening the truss rod to allow the strings to pull the neck forward further. If it covers a large area of the fingerboard, the action is probably too low. Remember that it could be a combination of the two.
If the buzzing only affects the frets nearer the bridge, the action may be too low (and you may be able to use a flatter neck relief as well).
If the buzzing only affects the first fret, the nut slot for that string may be cut too low. You can check this using the continuity tester on a multimeter: fret between the 2nd and 3rd fret, and check for electrical continuity between the string and the 1st fret. A beep indicates that the nut slot for that string has been cut too low. A fret dress might help, but a new nut is probably in order. The nut could also be removed and raised slightly with shims.
Other, less systematic buzzing may be due to frets sitting slightly proud. A fret dress (/crowning?) should fix this.
An oscilloscope can be used to identify the source of fret buzz. With the guitar unplugged, connect the oscilloscope ground to the negative terminal of a battery, and the positive battery terminal to the guitar strings. Touch the oscilloscope probe to the fret you wish to test, and strum. You will see voltage spikes if the string hits the fret. Fret buzz seems to start at a fret closer to the nut, and then progressively spread to the adjacent frets.
TODO: diagram
This intonation problem is likely due to the nut (not the bridge adjustments), especially if you tune using the open strings. Many guitars place the nut where the “zeroth” fret would be. This will generally result open strings being flat compared to the rest of the instrument, because the open strings are not subject to the extra tension due to fretting. A high nut slot height will exaggerate this problem, though it cannot be corrected by deepening the nut slots alone! Even guitars with a zero fret instead of a nut will have this problem.
If you don’t want to fix the nut, you can adjust your tuning method to give a compromise: tune the open string slightly flat, or tune to a fretted note on each string instead of the open strings (easier if you have bridge-end fine tuners).